

Hey bloggers, social media, Instagramers, designers, and enthusiasts etc etc… how are you? 😊
I think the question I hear most in my professional life is: which app do you use to edit your photos?
Well, I’ve been working with Photoshop for over 12 years, so it is my go to option for pretty much anything in design, including some photo editing. I know how powerful it is and just love it!


As a graphic designer, there is no doubt Photoshop (software, I don’t use the app) is a super important editing tool in my life 💖💗 But I use it mostly for advanced work, or more complicated photo editings, like whenever I want to change the background, edit the color of a specific element, or do some specific photo manipulation.
So what about apps? They offer cute filters, are fast and easy to use, and are super convenient, because they’re right there in the palm of our hands already! 😂😂
I’m a huge fan of Lightroom for the presets I create and sell on the shop, and for my personal photos. My second favourite? VSCO, for sure!
VSCO is free, has simple and efficient tools and it’s easy to use. There’s also a pro version that I’ve never used, but I’m aware it’s even better, with many more filters and a huge fanbase (vsco girls, anyone?).
Of course VSCO is an app specifically to apply filters and effects. To change the structure of the image (smoother skin, retouching, face shape changing, etc, there are special apps, like Facetune and Meitu.
But back to VSCO. Using the app is SO easy! You can pick one of the premade filters, or create your own with the tools offered, like brightness, sharpness, contrast, etc.

I’ve seen people getting a little lost with so many editing options, and getting the feeling that it’s too much to think and too time consuming. I don’t feel that way at all, I actually think VSCO is as simple and easy as any editing tool can be haha, but I understand the struggle. So I came up with a quick guide with the fundamental steps to edit your pics.
So here we go!
How to edit photos for Instagram with VSCO?
✨ The first thing to do is straighten it out. Notice if there are “lines” in the photo that are crooked. Usually they are the horizon: like the sidewalk, the street or the see, or buildings: trees, pilasters, or even your body.
To make life easier, it is best to try to make these lines as straight as possible already when taking the picture. Try to take the picture in the correct perspective, and keep the correct alignment of the elements, by holding the phone straight before you click. Except for photos with intentionally distorted angles, like selfies from bottom to top, etc, of course.
But hey! The straightening thing isn’t a rule for every single pic. Your gut will tell you what to do in each case, but when you start paying attention, you get the hang of it.

In addition to straightening, I also define the crop I like, in order to highlight the main element of the photo and give harmony to the image. Of course, that alignment and cutting can be done directly on Instagram, but me, I’d rather do it before so I can edit the photo in VSCO knowing exactly how it’ll look. So I basically just make the crop with the phone image editing tool, easy peasy.
Okay, now we open the VSCO! Choose the photo and let’s move on.
✨ First, choose the filter you are going to use. I’ve read many times that the cooler filters, that is, the ones with a bluish undertone, get more likes. I don’t know about that, and actually use a super warm filter myself.
Afterwards, you can calibrate the filter for more or less intensity.
✨ Sometimes the filter alone is enough to make the perfect photo. Mainly photos made outdoors, with lots of lighting are perfect. Usually, I like to brighten up the pic, give it some contrast and clarity and to tinker a bit in the fading too, so black parts are not too dark. This fading trick I think gives a more professional aesthetic to the pictures, so it’s a good trick if that’s what you’re aiming for.

I searched for a place lit by natural light, chose an interesting background, straightened the object and clicked the photo. In VSCO I just needed to add the HB1 filter and that was it. Loved the result!
That’s basically it, guys. Oh, I almost forgot! On VSCO you can bulk edit your pics. Simply copy the edits you made on the picture and paste it to as many others as you want. That’s the easiest thing like EVER.
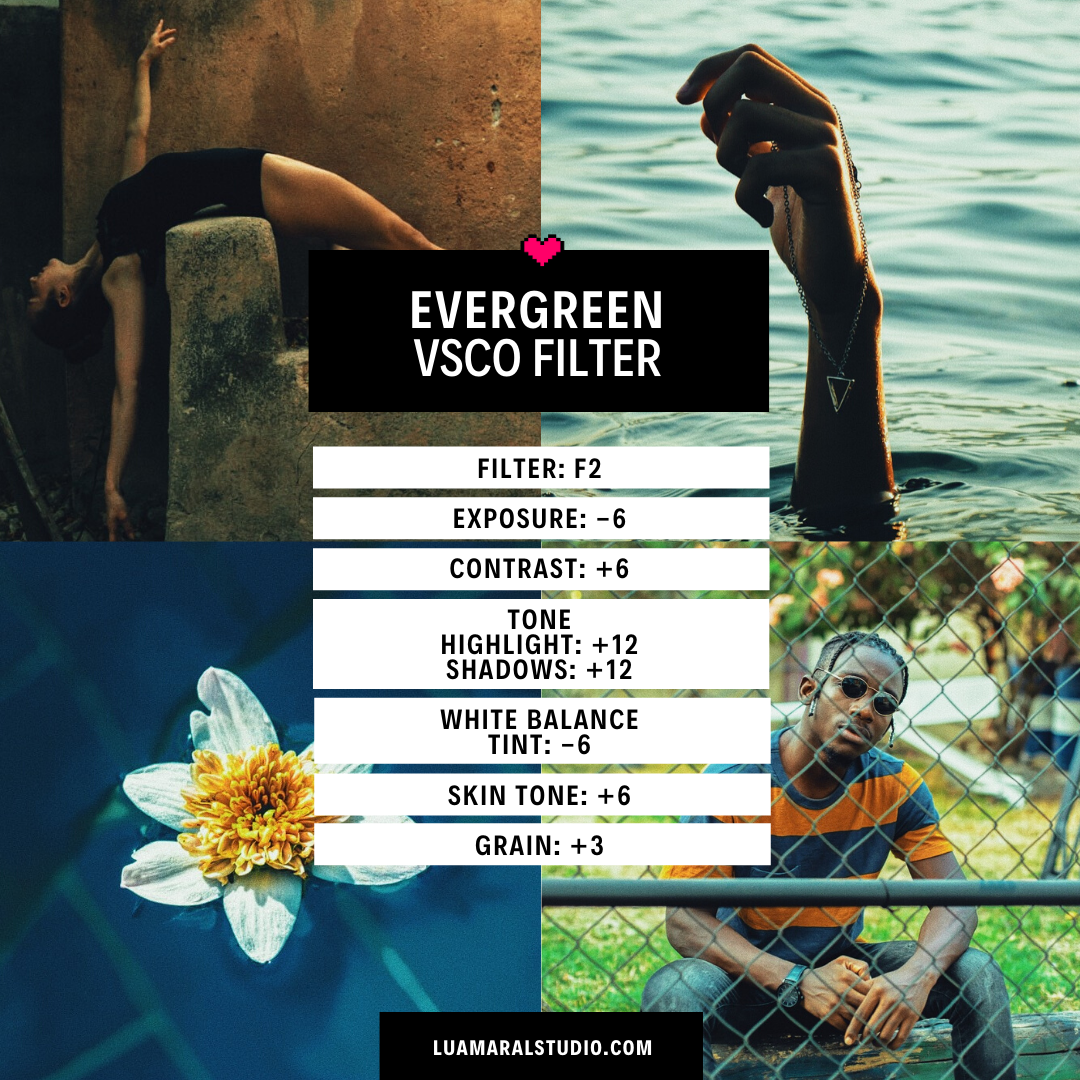
Wanna play around with VSCO? here’s a collection of edits you can try on your pics. All created by me!


See you again soon! 😜🎆
Beijos
Lu


&url=https://www.theaesthetic.shop/product/30-perfect-pink-aesthetic-high-resolution-digital-images-with-editable-canva-template/&media=https://www.theaesthetic.shop/wp-content/uploads/2023/08/30-Perfect-Pink-aesthetic-high-resolution-DIGITAL-images-with-editable-Canva-template-2.jpg)